Installation
The Arduino-Pico core can be installed using the Arduino IDE Boards Manager or using git. If you want to simply write programs for your RP2040 board, the Boards Manager installation will suffice, but if you want to try the latest pre-release versions and submit improvements, you will need the git installation.
Installing via Arduino Boards Manager
Open up the Arduino IDE and go to File->Preferences.
In the dialog that pops up, enter the following URL in the “Additional Boards Manager URLs” field: https://github.com/earlephilhower/arduino-pico/releases/download/global/package_rp2040_index.json
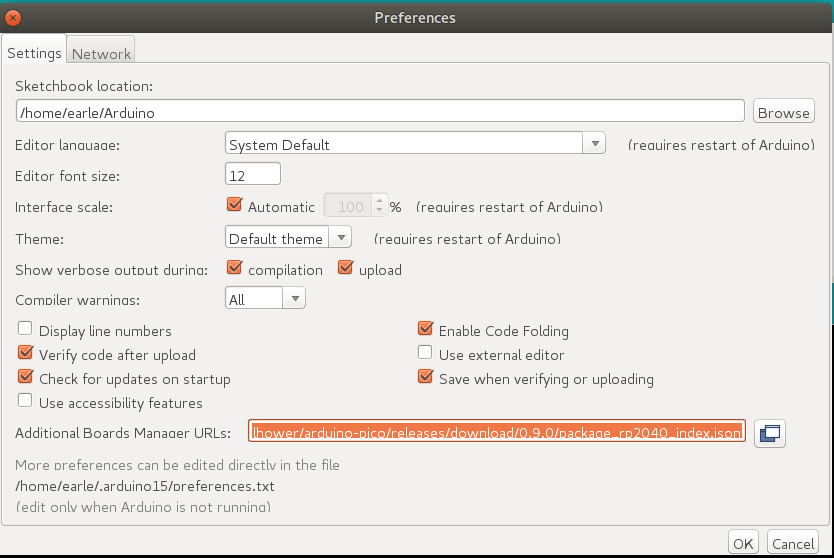
Hit OK to close the dialog.
Go to Tools->Boards->Board Manager in the IDE
Type “pico” in the search box and select “Add”:

Arduino IDE Installation Warning
Note for Windows Users: Please do not use the Windows Store version of the actual Arduino application because it has issues detecting attached Pico boards. Use the “Windows ZIP” or plain “Windows” executable (EXE) download direct from https://arduino.cc. and allow it to install any device drivers it suggests. Otherwise the Pico board may not be detected.
Note
Windows users with non-ASCII characters in their username (e.g., accented
letters like Í, umlauts like ü, or characters like ñ): The ARM GCC
toolchain (pqt-gcc) used by this core does not handle non-ASCII characters in
Windows file paths. If your Windows username contains such characters (e.g.,
C:\Users\Íñigo instead of C:\Users\Inigo), compilation will fail with
linker errors like cannot open linker script file ... Invalid argument.
The recommended workaround is to create an additional local Windows user with
an ASCII-only name and use that profile for RP2040/RP2350 development.
See issue #2689
for more details.
Note for Linux Users: If you installed the Arduino IDE using Flatpak, which
is common in Pop!_OS, Fedora, and Mint, among others, you may need to configure
Flatpak to allow the IDE access to files outside your home folder. The RP2040
device is sometimes mounted as a folder in /opt or /media, which Flatpak will
prevent the Arduino IDE from accessing. For Arduino IDE V2, override the filesystem
restriction using flatpak override --user --filesystem=host cc.arduino.IDE2 . For
For Arduino IDE < V2, use flatpak override --user --filesystem=host cc.arduino.arduinoide.
Installing via Arduino CLI
To install using the Arduino command line tool (arduino-cli):
arduino-cli config add board_manager.additional_urls https://github.com/earlephilhower/arduino-pico/releases/download/global/package_rp2040_index.json
arduino-cli core update-index
arduino-cli core install rp2040:rp2040
To list the supported boards:
arduino-cli board listall | grep rp2040
Installing via GIT
To install via GIT (for latest and greatest versions):
mkdir -p ~/Arduino/hardware/pico
git clone https://github.com/earlephilhower/arduino-pico.git ~/Arduino/hardware/pico/rp2040
cd ~/Arduino/hardware/pico/rp2040
git submodule update --init
cd pico-sdk
git submodule update --init
cd ../tools
python3 ./get.py
Installing both Arduino and CMake
Tom’s Hardware presented a very nice writeup on installing arduino-pico on both Windows and Linux, available at Tom’s Hardware .
If you follow their step-by-step you will also have a fully functional CMake-based environment to build Pico apps on if you outgrow the Arduino ecosystem.
Uploading Sketches
To upload your first sketch, you will need to hold the BOOTSEL button down while plugging in the Pico to your computer. Then hit the upload button and the sketch should be transferred and start to run.
After the first upload, this should not be necessary as the arduino-pico core has auto-reset support. Select the appropriate serial port shown in the Arduino Tools->Port->Serial Port menu once (this setting will stick and does not need to be touched for multiple uploads). This selection allows the auto-reset tool to identify the proper device to reset. Them hit the upload button and your sketch should upload and run.
In some cases the Pico will encounter a hard hang and its USB port will not respond to the auto-reset request. Should this happen, just follow the initial procedure of holding the BOOTSEL button down while plugging in the Pico to enter the ROM bootloader.
Uploading the First Sketch
The first time you upload a sketch to a board, you’ll need to use the built-in ROM bootloader to handle the upload and not a serial port.
Hold the BOOTSEL button while plugging in the board.
Select
Tools->Port->UF2 Boardfrom the menu.Upload as normal.
After the board boots up, select the new serial port from the
Tools->Portmenu.
Windows 7 Driver Notes
Windows 10, Linux, and Mac will all support the Pico CDC/ACM USB serial port automatically. However, Windows 7 may not include the proper driver and therefore no detect the Pico for automatic uploads or the Serial Monitor.
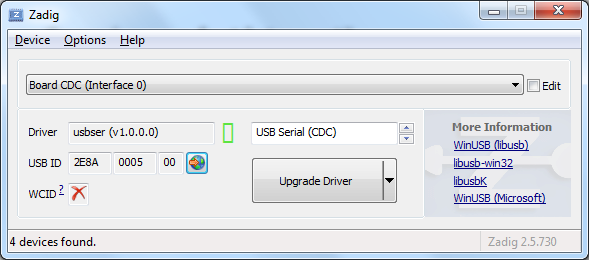
For Windows 7, if this occurs, you can use Zadig <https://zadig.akeo.ie/>
to install the appropriate driver. Select the USB ID of 2E8A and use
the USB Serial (CDC) driver.
Windows 7 Installation Problems
When running MalwareBytes antivirus (or others) the scanner may lock the compiler or other toolchain executables, causing installation or build failures. (Thanks to @Andy2No)
Symptoms include:
Access denied during update in the boards manager - affects the .exe files, because MalwareBytes has locked them.
Access denied during compilation, to one of the .exe files - same reason.
Can’t delete the .exe files - they’re locked by MalwareBytes.
A workaround is possible, involving setting the toolchain as an “excluded directory” and reinstalling.
In MalwareBytes Settings, click the Exclusions tab. Add an exclusion for the equivalent of this folder path:
C:\Users{YOUR_USERNAME_HERE}\AppData\Local\Arduino15\packages\rp2040\tools\pqt-gcc\1.1.0-a-81a1771
Reboot to unlock the files.
Do the boards manager installation / upgrade again.
Set the board type, e.g. to Raspberry Pi Pico and check it can compile.
Uploading Filesystem Images
The onboard flash filesystem for the Pico, LittleFS, lets you upload a filesystem image from the sketch directory for your sketch to use. Download the needed plugin from
IDE 1.x: https://github.com/earlephilhower/arduino-pico-littlefs-plugin/releases
IDE 2.x: https://github.com/earlephilhower/arduino-littlefs-upload/releases
To install, follow the directions in
IDE 1.x: https://github.com/earlephilhower/arduino-pico-littlefs-plugin/blob/master/README.md
IDE 2.x: https://github.com/earlephilhower/arduino-littlefs-upload/blob/main/README.md
For detailed usage information, please check the repo documentation available at
Uploading Sketches with Picotool
Because the Picotool uses a custom device driver in the Pico to handle upload, when using the Upload Method->Picotool mode custom code needs to be run on the Pico which is not included by default for compatibility and code savings.
So for the first sketch you will need to rebuild (with the Upload Method->Picotool selected in them menus) and then manually hold down BOOTSEL and insert the Pico USB cable to enter the ROM bootloader.
After the initial upload, as long as the running binary was built using the Picotool upload method, then the normal upload process should work.
For Ubuntu and other Linux operating systems you may need to add the following lines to a new udev config file(99-picotool.rules) to allow normal users to access the special USB device the Pico exports:
echo 'SUBSYSTEM=="usb", ATTRS{idVendor}=="2e8a", ATTRS{idProduct}=="0003", MODE="660", GROUP="plugdev"' | sudo tee -a /etc/udev/rules.d/98-Picotool.rules
echo 'SUBSYSTEM=="usb", ATTRS{idVendor}=="2e8a", ATTRS{idProduct}=="000a", MODE="660", GROUP="plugdev"' | sudo tee -a /etc/udev/rules.d/98-Picotool.rules
echo 'SUBSYSTEM=="usb", ATTRS{idVendor}=="2e8a", ATTRS{idProduct}=="f00a", MODE="660", GROUP="plugdev"' | sudo tee -a /etc/udev/rules.d/98-Picotool.rules
echo 'SUBSYSTEM=="usb", ATTRS{idVendor}=="2e8a", ATTRS{idProduct}=="000f", MODE="660", GROUP="plugdev"' | sudo tee -a /etc/udev/rules.d/98-Picotool.rules
echo 'SUBSYSTEM=="usb", ATTRS{idVendor}=="2e8a", ATTRS{idProduct}=="f00f", MODE="660", GROUP="plugdev"' | sudo tee -a /etc/udev/rules.d/98-Picotool.rules
sudo udevadm control --reload
Note that in some Linux distributions the plugdev above needs to be dialout and for boards other than the Raspberry Pi Pico line you may need to manually add their USB VID and PID to the list above.
Uploading Sketches with Picoprobe
If you have built a Raspberry Pi Picoprobe, you can use OpenOCD to handle your sketch uploads and for debugging with GDB.
Under Windows a local admin user should be able to access the Picoprobe port automatically, but under Linux udev must be told about the device and to allow normal users access.
To set up user-level access to Picoprobes on Ubuntu (and other OSes which use udev):
echo 'SUBSYSTEMS=="usb", ATTRS{idVendor}=="2e8a", ATTRS{idProduct}=="0004", GROUP="users", MODE="0666"' | sudo tee -a /etc/udev/rules.d/98-PicoProbe.rules
sudo udevadm control --reload
The first line creates a file with the USB vendor and ID of the Picoprobe and tells UDEV to give users full access to it. The second causes udev to load this new rule. Note that you will need to unplug and re-plug in your device the first time you create this file, to allow udev to make the device node properly.
Once Picoprobe permissions are set up properly, then select the board “Raspberry Pi Pico (Picoprobe)” in the Tools menu and upload as normal.
Uploading Sketches with OpenOCD
Under Windows and macOS, any user should be able to access OpenOCD automatically, but under Linux udev must be told about the device and to allow normal users access.
To set up user-level access to all CMSIS-DAP adapters on Ubuntu (and other OSes which use udev):
echo 'ATTRS{product}=="*CMSIS-DAP*", MODE="664", GROUP="plugdev"' | sudo tee -a /etc/udev/rules.d/98-CMSIS-DAP.rules
sudo udevadm control --reload
The first line creates a file that recognizes all CMSIS-DAP adapters and tells UDEV to give users full access to it. The second causes udev to load this new rule. Note that you will need to unplug and re-plug in your device the first time you create this file, to allow udev to make the device node properly.
Once CMSIS-DAP permissions are set up properly, then select the Upload Method “Picoprobe/Debugprobe (CMSIS-DAP)” in the Tools menu.
Debugging with Picoprobe/Debugprobe, OpenOCD, and GDB
The installed tools include a version of OpenOCD (in the pqt-openocd directory) and GDB (in the pqt-gcc directory). These may be used to run GDB in an interactive window as documented in the Pico Getting Started manuals from the Raspberry Pi Foundation.