Using this core with PlatformIO
What is PlatformIO?
PlatformIO is a free, open-source build-tool written in Python, which also integrates into VSCode code as an extension.
PlatformIO significantly simplifies writing embedded software by offering a unified build system, yet being able to create project files for many different IDEs, including VSCode, Eclipse, CLion, etc. Through this, PlatformIO can offer extensive features such as IntelliSense (autocomplete), debugging, unit testing etc., which not available in the standard Arduino IDE.
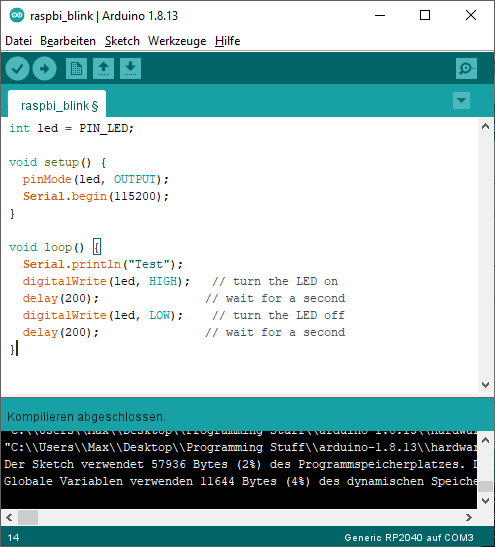
The Arduino IDE experience:
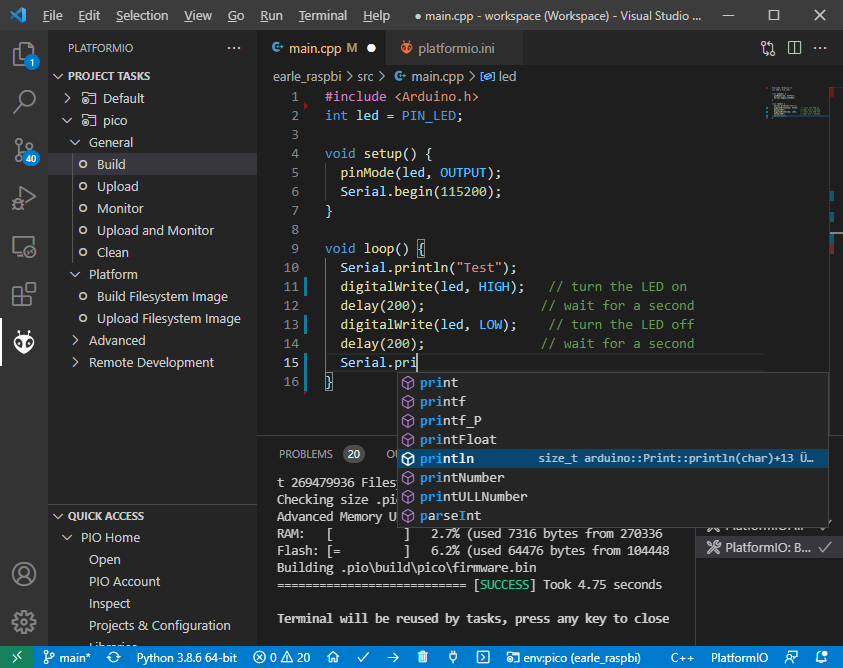
The PlatformIO experience:
Refer to the general documentation at https://docs.platformio.org/.
Especially useful is the Getting started with VSCode + PlatformIO, CLI reference and the platformio.ini options page.
Hereafter it is assumed that you have a basic understanding of PlatformIO in regards to project creation, project file structure and building and uploading PlatformIO projects, through reading the above pages.
Important steps for Windows users, before installing
By default, Windows has a limited path length that is not long enough to fully clone the Pico-SDK’s tinyusb repository, resulting in error messages like the one below while attempting to fetch the repository.
error: unable to create file '.....' : Filename too long
To work around this requires performing two steps and rebooting Windows once. These steps will enable longer file paths at the Windows OS and the git level.
Step 1: Enabling long paths in git
Open up a Windows cmd or terminal window and execute the following command
git config --system core.longpaths true
Step 2: Enabling long paths in the Windows OS
(taken from https://www.microfocus.com/documentation/filr/filr-4/filr-desktop/t47bx2ogpfz7.html)
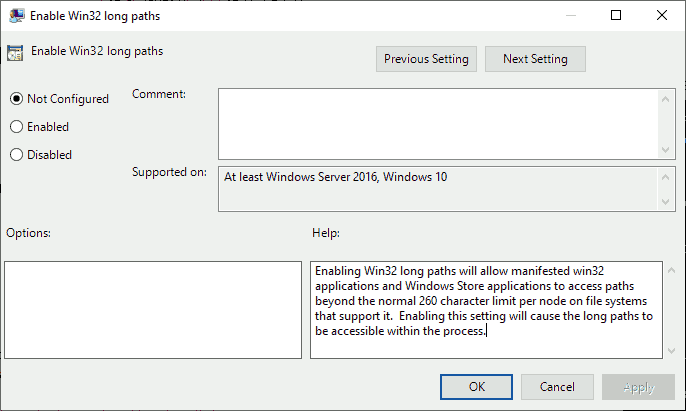
Click Window key and type gpedit.msc, then press the Enter key. This launches the Local Group Policy Editor.
Navigate to Local Computer Policy > Computer Configuration > Administrative Templates > System > Filesystem.
Double click Enable NTFS/Win32 long paths and close the dialog.
Step 3: Reboot the computer
Once the two prior stages are complete, please do a full reboot or power cycle so that the new settings will take effect.
Updating platformio.ini to use the proper platform
First create a standard Raspberry Pi Pico + Arduino project within PlatformIO.
This will give you a project with the platformio.ini
[env:pico]
platform = raspberrypi
board = pico
framework = arduino
Here, you need to change the platform to take advantage of the features described hereunder and switch to the new core.
[env:pico]
platform = https://github.com/maxgerhardt/platform-raspberrypi.git
board = pico
framework = arduino
board_build.core = earlephilhower
When the support for this core has been merged into mainline PlatformIO, this notice will be removed and a standard platformio.ini as shown above will work as a base.
Deprecation warnings
Previous versions of this documentation told users to inject the framework and toolchain package into the project by using
; note that download link for toolchain is specific for OS. see https://github.com/earlephilhower/pico-quick-toolchain/releases.
platform_packages =
    maxgerhardt/framework-arduinopico@https://github.com/earlephilhower/arduino-pico.git
    maxgerhardt/toolchain-pico@https://github.com/earlephilhower/pico-quick-toolchain/releases/download/1.3.1-a/x86_64-w64-mingw32.arm-none-eabi-7855b0c.210706.zip
This is now deprecated and should not be done anymore. Users should delete these platform_packages lines and update the platform integration by issuing the command
pio pkg update -g -p https://github.com/maxgerhardt/platform-raspberrypi.git
in the PlatformIO CLI. The same can be achieved by using the VSCode PIO Home -> Platforms -> Updates GUI.
The toolchain, which was also renamed to toolchain-rp2040-earlephilhower is downloaded automatically from the registry. The same goes for the framework-arduinopico toolchain package, which points directly to the Arduino-Pico Github repository.
However, users can still select a custom fork or branch of the core if desired so, as detailed in a chapter below.
Selecting the new core
Prerequisite for using this core is to tell PlatformIO to switch to it.
There will be board definition files where the Earle-Philhower core will
be the default since it’s a board that only exists in this core (and not
the other https://github.com/arduino/ArduinoCore-mbed). To switch boards
for which this is not the default core (which are only
board = pico and board = nanorp2040connect), the directive
board_build.core = earlephilhower
must be added to the platformio.ini. This controls the core
switching
logic.
When using Arduino-Pico-only boards like board = rpipico or board = adafruit_feather, this is not needed.
Flash size
Controlled via specifying the size allocated for the filesystem.
Available sketch size is calculated accordingly by using (as in
makeboards.py) that number and the (constant) EEPROM size (4096
bytes) and the total flash size as known to PlatformIO via the board
definition file. The expression on the right can involve “b”,”k”,”m”
(bytes/kilobytes/megabytes) and floating point numbers. This makes it
actually more flexible than in the Arduino IDE where there is a finite
list of choices. Calculations happen in the
platform.
; in reference to a board = pico config (2MB flash)
; Flash Size: 2MB (Sketch: 1MB, FS:1MB)
board_build.filesystem_size = 1m
; Flash Size: 2MB (No FS)
board_build.filesystem_size = 0m
; Flash Size: 2MB (Sketch: 0.5MB, FS:1.5MB)
board_build.filesystem_size = 1.5m
PSRAM size
For RP2350 based boards, this controls how much PSRAM the firmware will think it has available in bytes, mapped at starting address 0x11000000.
To learn more about PSRAM usage, see: RP2350 PSRAM Support
; PSRAM size: 1MB
board_upload.psram_length = 1048576
; PSRAM size: 2MB
board_upload.psram_length = 2097152
; PSRAM size: 4MB
board_upload.psram_length = 4194304
PSRAM chip select (CS)
For RP2350 based boards, this controls what chip-select (also called: slave-select / SS) pin to use when wanting to talk to the PSRAM chip.
Note that it’s not needed to set this with a board that is known to have a PSRAM chip on-board, such as a “Sparkfun Thing Plus 2350”. The pins_arduino.h of that variant already has the correct definition.
To learn more about PSRAM usage, see: RP2350 PSRAM Support
; PSRAM CS is at GP47
build_flags =
  -DRP2350_PSRAM_CS=47
Boot2 Source
Boot2 is the second stage bootloader and predominantly used on the RP2040.
Its main purpose is to configure the communication with the Flash at the highest, safest speed it can.
All known boards have their correct value already configured. However, when choosing board = generic,
you can freely configure the Boot2 to be for a different flash.
For possible Boot2 filenames, please see here.
; expect an ISSI IS25LP080 flash, SPI frequency = CPU frequency divided by 2
board_build.arduino.earlephilhower.boot2_source = boot2_is25lp080_2_padded_checksum.S
CPU Speed
As for all other PlatformIO platforms, the f_cpu macro value (which
is passed to the core) can be changed as
documented
; 133MHz
board_build.f_cpu = 133000000L
Debug Port
Via build_flags as done for many other cores (example).
; Debug Port: Serial
build_flags = -DDEBUG_RP2040_PORT=Serial
; Debug Port: Serial 1
build_flags = -DDEBUG_RP2040_PORT=Serial1
; Debug Port: Serial 2
build_flags = -DDEBUG_RP2040_PORT=Serial2
Debug Level
Done again by directly adding the needed build flags. When wanting to define multiple build flags, they must be accumulated in either a single line or a newline-separated expression.
; Debug level: Core
build_flags = -DDEBUG_RP2040_CORE
; Debug level: SPI
build_flags = -DDEBUG_RP2040_SPI
; Debug level: Wire
build_flags = -DDEBUG_RP2040_WIRE
; Debug level: All
build_flags = -DDEBUG_RP2040_WIRE -DDEBUG_RP2040_SPI -DDEBUG_RP2040_CORE
; Debug level: NDEBUG
build_flags = -DNDEBUG

; example: Debug port on serial 2 and all debug output
build_flags = -DDEBUG_RP2040_WIRE -DDEBUG_RP2040_SPI -DDEBUG_RP2040_CORE -DDEBUG_RP2040_PORT=Serial2
; equivalent to above
build_flags =
   -DDEBUG_RP2040_WIRE
   -DDEBUG_RP2040_SPI
   -DDEBUG_RP2040_CORE
   -DDEBUG_RP2040_PORT=Serial2
C++ Exceptions
Exceptions are disabled by default. To enable them, use
; Enable Exceptions
build_flags = -DPIO_FRAMEWORK_ARDUINO_ENABLE_EXCEPTIONS
Stack Protector
To enable GCC’s stack protection feature, use
; Enable Stack Protector
build_flags = -fstack-protector
RTTI
RTTI (run-time type information) is disabled by default. To enable it, use
; Enable RTTI
build_flags = -DPIO_FRAMEWORK_ARDUINO_ENABLE_RTTI
USB Stack
Not specifying any special build flags regarding this gives one the default Pico SDK USB stack. To change it, add
; Adafruit TinyUSB
build_flags = -DUSE_TINYUSB
; No USB stack
build_flags = -DPIO_FRAMEWORK_ARDUINO_NO_USB
Note that the special “No USB” setting is also supported, through the
shortcut-define PIO_FRAMEWORK_ARDUINO_NO_USB.
USB Customization
If you want to change the USB VID, PID, product or manufacturer name that the device will appear under, configure them as follows:
board_build.arduino.earlephilhower.usb_manufacturer = Custom Manufacturer
board_build.arduino.earlephilhower.usb_product = Ultra Cool Product
board_build.arduino.earlephilhower.usb_vid = 0xABCD
board_build.arduino.earlephilhower.usb_pid = 0x1337
IP Stack
The lwIP stack can be configured to support only IPv4 (default) or additionally IPv6. To activate IPv6 support, add
; IPv6
build_flags = -DPIO_FRAMEWORK_ARDUINO_ENABLE_IPV6
to the platformio.ini.
Bluetooth Stack
The Bluetooth Classic (BTC) and Bluetooth Low Energy (BLE) stack can be activated by adding
; BTC and BLE
build_flags = -DPIO_FRAMEWORK_ARDUINO_ENABLE_BLUETOOTH
to the platformio.ini.
FreeRTOS
FreeRTOS support can be activated by adding
; Enable FreeRTOS Support
build_flags = -DPIO_FRAMEWORK_ARDUINO_ENABLE_FREERTOS
to the platformio.ini.
Selecting a different core version
If you wish to use a different version of the core, e.g., the latest git
master version, you can use a
platform_packages
directive to do so. Simply specify that the framework package
(framework-arduinopico) comes from a different source.
platform_packages =
   framework-arduinopico@https://github.com/earlephilhower/arduino-pico.git#master
Whereas the #master can also be replaced by a #branchname or a
#commithash. If left out, it will pull the default branch, which is master.
The file:// and symlink:// pseudo-protocols can also be used instead of https:// to point to a
local copy of the core (with e.g. some modifications) on disk (see documentation).
Note that this can only be done for versions that have the PlatformIO builder script it in, so versions before 1.9.2 are not supported.
Selecting the CPU architecture
By default Platform.IO will build for the onboard ARM cores on the RP2350. To build RISC-V binaries
adjust the board_build.mcu option accordingly:
; RP2350 based (RISC-V)
[env:rpipico2-riscv]
board = rpipico2
board_build.mcu = rp2350-riscv
Examples
The following example platformio.ini can be used for a Raspberry Pi Pico
and 0.5MByte filesystem.
[env:pico]
platform = https://github.com/maxgerhardt/platform-raspberrypi.git
board = pico
framework = arduino
; board can use both Arduino cores -- we select Arduino-Pico here
board_build.core = earlephilhower
board_build.filesystem_size = 0.5m
The initial project structure should be generated just creating a new
project for the Pico and the Arduino framework, after which the
auto-generated platformio.ini can be adapted per above.
Debugging
With recent updates to the toolchain and OpenOCD, debugging firmwares is also possible.
To specify the debugging adapter, use debug_tool (documentation). Supported values are:
picoprobecmsis-dapjlinkraspberrypi-swdblackmagic
These values can also be used in upload_protocol if you want PlatformIO to upload the regular firmware through this method, which you likely want.
Especially the PicoProbe method is convenient when you have two Raspberry Pi Pico boards. One of them can be flashed with the PicoProbe firmware (documentation) and is then connected to the target Raspberry Pi Pico board (see documentation chapter “Picoprobe Wiring”). Remember that on Windows, you have to use Zadig to also load “WinUSB” drivers for the “Picoprobe (Interface 2)” device so that OpenOCD can speak to it.
Note
Newer PicoProbe firmware versions have dropped the proprietary “PicoProbe” USB communication protocol and emulate a CMSIS-DAP instead. Meaning, you have to use debug_tool = cmsis-dap for these newer firmwares, such as those obtained from raspberrypi/picoprobe
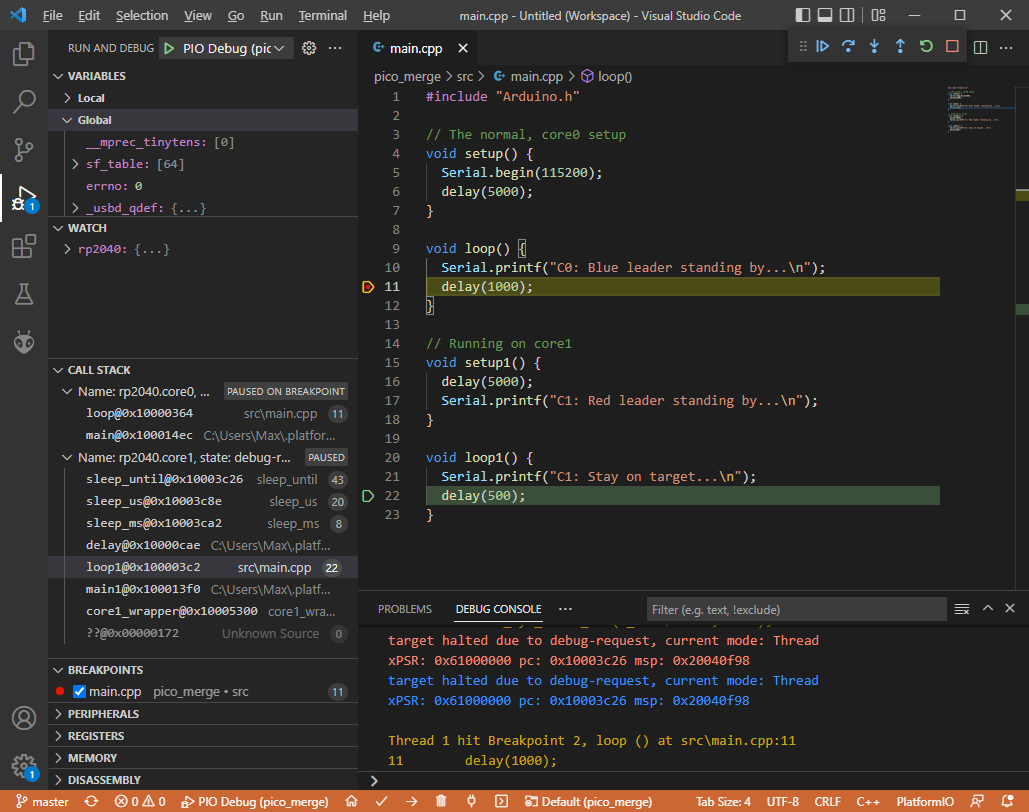
With that set up, debugging can be started via the left debugging sidebar and works nicely: Setup breakpoints, inspect the value of variables in the code, step through the code line by line. When a breakpoint is hit or execution is halted, you can even see the execution state both Cortex-M0+ cores of the RP2040.
For further information on customizing debug options, like the initial breakpoint or debugging / SWD speed, consult the documentation.
Note
For the BlackMagicProbe debugging probe (as can be e.g., created by simply flashing a STM32F103C8 “Bluepill” board), you currently have to use the branch fix/rp2040-flash-reliability (or at least commit 1d001bc) and use the official ARM provided toolchain.
You can obtain precompiled binaries from here. A flashing guide is available here. You then have to configure the target serial port (“GDB port”) in your project per documentation.
Filesystem Uploading
For the Arduino IDE, a plugin is available that enables a data folder to be packed as a LittleFS filesystem binary and uploaded to the Pico.
This functionality is also built-in in the PlatformIO integration. Open the project tasks and expand the “Platform” tasks:
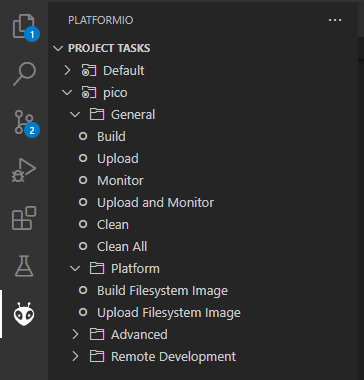
The files you want to upload should be placed in a folder called data inside the project. This can be customized if needed.
The task “Build Filesystem Image” will take all files in the data directory and create a littlefs.bin file from it using the mklittlefs tool.
The task “Upload Filesystem Image” will upload the filesystem image to the Pico via the specified upload_protocol.
Note
Set the space available for the filesystem in the platformio.ini using e.g., board_build.filesystem_size = 0.5m, or filesystem creation will fail!